
Easy Dairy-Free Pad Thai (30-Minute Thai-Inspired Dinner)
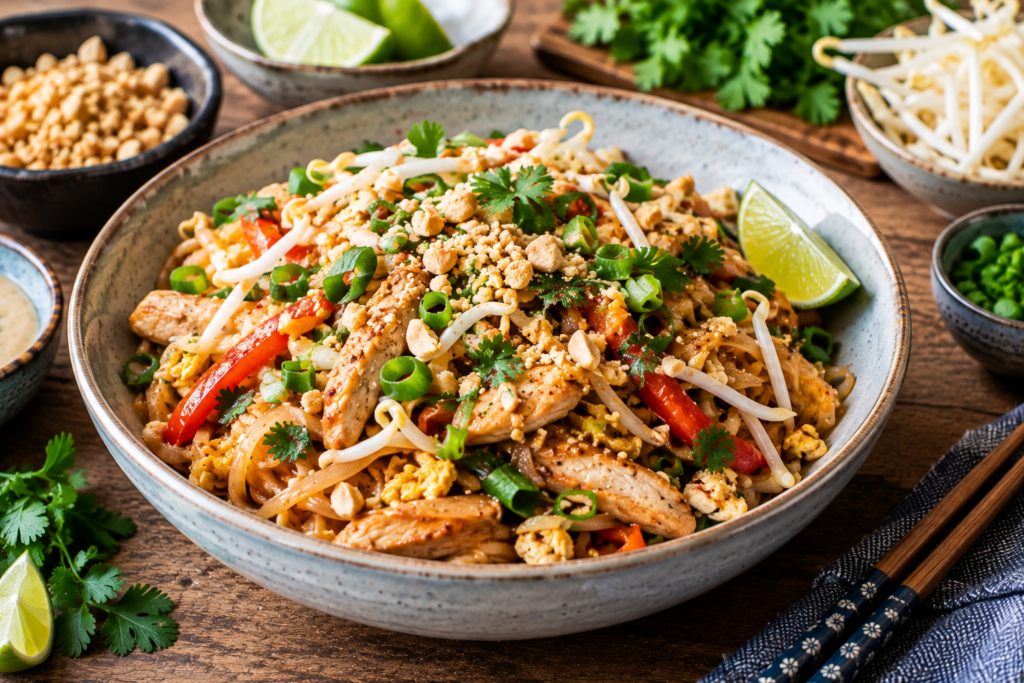
This easy dairy-free Pad Thai combines chewy rice noodles, tender chicken, crisp vegetables, scrambled egg, crunchy peanuts, and a delicious sweet-and-tangy sauce. Ready in about 30 minutes, it’s a flavorful homemade dinner that’s perfect when you’re craving takeout-style Thai food without the dairy.
Why You’ll Love This Dairy-Free Pad Thai
Pad Thai is one of those meals that looks complicated but becomes surprisingly manageable once you have all the ingredients prepared.
The key is to prepare everything before you start cooking. Once the wok or skillet is hot, the ingredients come together quickly.
This dairy-free version uses rice noodles, chicken, egg, vegetables, peanuts, lime juice, tamarind, and a savory sauce. There is no butter, cream, or cheese involved.
Recipe highlights:
- Naturally dairy-free
- Ready in about 30 minutes
- Medium difficulty
- Full of fresh flavors
- Sweet, salty, sour, and savory
- Great for busy weeknights
- Easy to customize
- Perfect for a homemade takeout night
Recipe at a Glance
| Prep | 20 minutes |
| Cook | 10 minutes |
| Servings | 4 servings |
| Difficulty | Medium |
Ingredients
For the Pad Thai
- 250 g (9 oz) dried rice noodles
- 450 g (1 lb) boneless, skinless chicken thighs or chicken breast
- 2 tablespoons neutral cooking oil
- 2 garlic cloves, minced
- 1 small red bell pepper, thinly sliced
- 1 cup bean sprouts
- 2 large eggs
- 3 spring onions, sliced
- ½ cup roasted unsalted peanuts, roughly chopped
For the Pad Thai Sauce
- 3 tablespoons tamari or soy sauce
- 2 tablespoons tamarind paste
- 2 tablespoons brown sugar
- 1½ tablespoons fresh lime juice
- 1 tablespoon rice vinegar
- 1 teaspoon chili flakes, optional
- 2 tablespoons water
For Serving
- Fresh lime wedges
- Extra bean sprouts
- Chopped peanuts
- Fresh cilantro
- Sliced spring onions
- Chili flakes
Equipment
- Large wok or skillet
- Large pot or heatproof bowl
- Small mixing bowl
- Whisk
- Tongs
- Wooden spoon
- Sharp knife
- Cutting board
- Colander
Step-by-Step Instructions
Step 1: Prepare the Rice Noodles
Place the rice noodles in a large bowl.
Cover them with warm water and allow them to soak according to the package instructions, usually around 20–30 minutes.
The noodles should become flexible but still slightly firm.
Drain them thoroughly and set aside.
Don’t fully cook the noodles at this stage. They will finish cooking in the wok.
Step 2: Prepare the Sauce
Add the soy sauce or tamari, tamarind paste, brown sugar, lime juice, rice vinegar, chili flakes, and water to a small bowl.
Whisk until the sugar has mostly dissolved.
Taste the sauce.
It should have a balanced combination of sweet, salty, sour, and slightly spicy flavors.
Set aside.
Step 3: Prepare the Chicken
Slice the chicken into thin, bite-sized pieces.
Try to keep the pieces similar in size so they cook evenly.
Season lightly with salt and pepper if desired.
Step 4: Prepare the Vegetables
Slice the red bell pepper.
Chop the spring onions.
Roughly chop the peanuts.
Keep the bean sprouts ready.
Because the cooking process moves quickly, it’s best to have everything prepared before turning on the heat.
Step 5: Cook the Chicken
Heat 1 tablespoon of oil in a large wok or skillet over medium-high heat.
Add the chicken in a single layer.
Cook for approximately 4–5 minutes, stirring occasionally, until golden and cooked through.
Transfer the chicken to a clean plate.
Step 6: Cook the Garlic and Pepper
Add another tablespoon of oil to the wok.
Add the minced garlic and sliced red bell pepper.
Stir-fry for approximately 1–2 minutes.
The garlic should become fragrant while the pepper remains slightly crisp.
Step 7: Add the Eggs
Push the vegetables to one side of the wok.
Crack the eggs into the empty side.
Allow them to cook for approximately 30 seconds before gently scrambling them with your spatula.
Cook until just set.
Step 8: Add the Noodles
Add the drained rice noodles to the wok.
Return the cooked chicken to the pan.
Use tongs to gently toss everything together.
Step 9: Add the Sauce
Pour the prepared Pad Thai sauce over the noodles.
Toss continuously for approximately 2–3 minutes.
The noodles will absorb the sauce as they finish cooking.
If the noodles appear too dry, add 1–2 tablespoons of water.
Step 10: Add the Fresh Ingredients
Add the bean sprouts and sliced spring onions.
Toss everything together for another 30–60 seconds.
Don’t overcook the bean sprouts—you want them to retain some crunch.
Step 11: Finish the Pad Thai
Remove the wok from the heat.
Add half of the chopped peanuts and toss them through the noodles.
Taste and adjust the flavor if necessary.
Add a little extra lime juice for brightness or chili flakes for more heat.
Step 12: Serve
Divide the Pad Thai between four bowls or plates.
Top with:
- Remaining chopped peanuts
- Fresh cilantro
- Bean sprouts
- Spring onions
- Chili flakes
Serve immediately with fresh lime wedges
Tips for the Best Dairy-Free Pad Thai
- Prepare all ingredients before you start cooking.
- Don’t fully cook the rice noodles during soaking.
- Use a large wok or skillet so the ingredients have room to move.
- Cook the chicken in a single layer for better browning.
- Don’t overcook the bean sprouts.
- Taste the sauce before adding it to the noodles.
- Add the sauce gradually if you’re unsure about the intensity.
- Serve immediately for the best noodle texture.
The most important tip is not to over-soak the rice noodles. Soft noodles can quickly turn mushy once they hit the hot sauce.
Delicious Variations
| Shrimp Pad Thai | Replace the chicken with approximately 450 g (1 lb) peeled shrimp. Cook the shrimp for 2–3 minutes per side until pink and cooked through. |
| Tofu Pad Thai | Replace the chicken with firm tofu. Press the tofu thoroughly, cut it into cubes, and pan-fry until golden before adding it to the noodles. |
| Vegetable Pad Thai | Skip the meat and add extra vegetables such as: Broccoli, Carrots, Mushrooms, Snap peas, Zucchini, Red cabbage, Spicy Pad Thai |
| Spicy Pad Thai | Add extra chili flakes or a little Thai chili paste to the sauce. |
| Peanut-Free Pad Thai | Simply leave out the peanuts and use toasted sunflower seeds or pumpkin seeds for crunch. |
| Gluten-Free Pad Thai | Use certified gluten-free tamari instead of regular soy sauce and check the labels on all packaged ingredients. |
How to Store Dairy-Free Pad Thai
In the Refrigerator
Store leftover Pad Thai in an airtight container for up to 3 days.
Reheating
Reheat gently in a skillet over medium heat.
Add a splash of water to loosen the noodles.
You can also microwave individual portions, adding a small amount of water before reheating.
Freezing
Pad Thai can technically be frozen, but the rice noodles can become softer after thawing.
For the best texture, make it fresh or refrigerate leftovers for a few days
Common Mistakes to Avoid
Over-Soaking the Noodles
Noodles that are already soft before entering the wok can become mushy.
Using a Small Pan
Crowding the ingredients prevents proper stir-frying.
Adding the Sauce Too Early
The noodles should be added before the sauce so they can absorb it while finishing their cooking.
Overcooking the Vegetables
Bean sprouts and peppers should retain some texture.
Not Tasting the Sauce
Pad Thai sauce should balance several flavors. Taste it before adding it to the noodles and adjust if needed.
Adding Too Much Liquid
Too much sauce or water can make the noodles soggy.
What Makes This Pad Thai Dairy-Free?
Traditional Pad Thai is often naturally dairy-free because its main ingredients don’t require milk, butter, or cheese.
This version uses oil for cooking and a homemade tamarind-based sauce.
However, packaged sauces can vary, so always check ingredient labels if you need to avoid dairy strictly.
| Traditional Ingredient | Dairy-Free Alternative |
|---|---|
| Cooking oil | Olive, avocado, or neutral oil |
| Soy sauce | Soy sauce or tamari |
| Butter | Cooking oil |
| Cheese & Cream | Not Needed |
The sauce gets its richness and complexity from tamarind, soy sauce, lime juice, sugar, and aromatics rather than dairy.
Serving Suggestions
Serve dairy-free Pad Thai with:
- Fresh lime wedges
- Extra peanuts
- Bean sprouts
- Fresh cilantro
- Spring onions
- Cucumber slices
- Thai-style cucumber salad
- Fresh chili
- Steamed edamame
For a complete Thai-inspired meal, serve the Pad Thai with fresh cucumber salad and plenty of lime.
Nutritional Information (Approximate Per Serving)
| Nutrient | Amount |
|---|---|
| Calories | 590 |
| Carbohydrates | 69 g |
| Fat | 22 g |
| Protein | 35 g |
| Fiber | 5 g |
| Sugar | 13 g |
Values are approximate and depend on the specific ingredients used.
Why This Pad Thai Is So Flavorful
The secret to good Pad Thai is balance.
Tamarind provides the characteristic tangy flavor, while brown sugar brings sweetness. Soy sauce adds savory depth, and fresh lime juice provides acidity and brightness.
Garlic and chili add warmth, while crunchy bean sprouts, peanuts, and fresh herbs provide contrast to the soft rice noodles.
The combination creates a dish that’s simultaneously sweet, sour, salty, savory, crunchy, and fresh.
Final Thoughts
This easy dairy-free Pad Thai is a great way to bring a completely different style of cooking to your recipe collection.
The recipe does require a little preparation and timing, making it a good medium-difficulty dish, but once all the ingredients are ready, the actual cooking happens very quickly.
It’s colorful, flavorful, filling, and perfect for a homemade takeout night.
Best of all, you can easily customize it with chicken, shrimp, tofu, or extra vegetables.
Frequently asked Questions

Is Pad Thai naturally dairy-free?
Many Pad Thai recipes are naturally dairy-free because they don’t require milk or cheese. However, ingredients and prepared sauces can vary, so checking labels is recommended.
Can I use chicken breast?
Yes. Chicken breast works very well. Slice it thinly so it cooks quickly without becoming dry.
Can I make Pad Thai vegetarian?
Yes. Replace the chicken with tofu and check your sauces carefully. Some traditional Thai fish sauces are not vegetarian.
Can I make this gluten-free?
Yes. Use certified gluten-free tamari and check all sauces and packaged ingredients.
Why are my noodles mushy?
The noodles were likely soaked or cooked for too long. They should still be slightly firm when they enter the wok because they finish cooking in the sauce.
Can I make the sauce ahead?
Yes. The sauce can be mixed up to 3 days ahead and stored covered in the refrigerator.
Check out also our other recipes!
If you loved this Pad Thai, there’s plenty more to discover. Explore MyDairyFreeRecipes for easy dinners, dairy-free breakfasts, healthy work lunches, creamy sauces without dairy, festive desserts, and beginner-friendly baking tips. Whether you’re cooking for everyday meals or special occasions, you’ll find simple, delicious recipes that make dairy-free eating easy and enjoyable.